


Corn light wiring is a process of installing LED corn light bulbs in place of traditional CFL, metal halide, or high pressure sodium bulbs. LED corn light bulbs are more energy-efficient, durable, and bright than other types of bulbs. They have a cylindrical shape that resembles a corn cob, hence the name.
When installing LED Corn Light bulbs, you may have to bypass the ballast to get it to work. This sounds daunting at first, but it is actually quite simple. You have to remember that you are not adding anything to the setup, just taking something out. Removing a component is always easier. We have a few tips and attached diagram with instructions.
Please remember to NEVER test a bulb with the ballast installed. You will destroy the bulb. Ballasts alter the voltage and will ruin the LED driver — magnetic ballasts step up to several hundred volts open-circuit, and electronic ballasts switch at 20–60 kHz, either of which destroys the driver within seconds.
What Is a Ballast Bypass?
To install LED corn light bulbs, you may have to bypass the ballast, which is a device that regulates the current and voltage of the bulb. Bypassing the ballast means connecting the power supply directly to the bulb, without using the ballast. This is because the ballast can interfere with the LED driver and cause damage or malfunction.
On a metal halide or HPS fixture, the ballast is typically a heavy iron-core transformer (magnetic) or a sealed electronic module wired between line input and the lamp socket leads. On a fluorescent fixture, it's a smaller electronic module providing high-frequency drive to the tube. In all three cases, the corn bulb's internal driver expects clean line voltage at 120V, 208V, 240V, 277V, or 480V — and a ballast output is not that.
New video added February 2020
See the full case study on this corn bulb installation here, or our buyers guide here for sizing recommendations by fixture type.
How to Install an LED Corn Light Bulb — Before & After + Drone — LED Corn Cob Bulb installation
Actual install of an LED Corn Bulb. 250 watt HPS to 80-watt LED (16 min 25 sec).
Fixture Types: What You'll Encounter
Incandescent, CFL, or Other Non-Ballast Fixtures
In these scenarios you are typically plug and play, no work required. These are your typical home, garage, and business fixtures where incandescent bulbs were originally. There is no excuse not to go LED lighting with these fixtures. Put a few 12-watt or 20-watt corn bulbs in your garage for brighter lighting. A 40-watt or 60-watt works great in post lights or other fixtures where you are using high-wattage incandescent.
The reason this class of fixture is simple: the socket is already wired for line voltage (black hot, white neutral) with no regulator in between. Screw in the LED, restore power, done. The only caveat is that some legacy hard-wired incandescent fixtures share a dimmer circuit; verify the corn bulb is compatible with wall-box dimmers (most standard corn bulbs are not dimmable) before you commission.
Metal Halide / High Pressure Sodium / CFL Fixtures
Light bulbs are typically powered by a magnetic or electronic ballast. For these you will need to remove the ballast and direct-wire power to the lamp socket. The hardest part is typically identifying the wiring in the correct order. Some ballasts may power multiple bulbs, and you will have to join the wiring back together or feed each socket from a separate line pair.
Going with corn cob bulbs is ideal here for the energy savings. You can easily replace a 250-watt metal halide with a 60-watt or 80-watt corn bulb and save over 70% off your energy bill. A 120-watt or 150-watt corn is an ideal replacement for a 400-watt metal halide. Jump up to 150 watts or 200 watts if you want a brighter 400-watt metal halide replacement. See our blog on lumens for replacing 400-watt metal halides with LED for the full wattage-to-lumens conversion chart.
A practical example from our install base: a warehouse running 24 × 400W metal halide high bays (9,600W connected load) retrofits to 24 × 150W LED corn bulbs (3,600W) — a 6,000-watt reduction. At 4,000 annual operating hours and $0.12/kWh, that is roughly $2,880 saved per year in energy alone, before factoring in the 100,000-hour LED lifespan vs. the ~15,000-hour metal halide service life.
Ballast Bypass — Step-by-Step Installation Instructions
To bypass the ballast and install LED corn light bulbs, you will need some basic tools and skills. A Phillips and flat screwdriver, wire strippers, wire nuts rated for the conductor gauge, a non-contact voltage tester, and a multimeter cover most residential and light-commercial jobs. You can follow these steps:
1. Turn off the power supply to the area where you want to install the light. You can do this by switching off the power switch or turning off the circuit breaker. Turning off power at the circuit breaker is best practice — per OSHA 1910.147 lockout/tagout rules and NFPA 70E safe work practices, you should lock and tag the breaker before working on any fixture.
Warning: Please make sure the power is off before installation. Verify dead at the socket with a non-contact voltage tester AND a meter — capacitor-start magnetic ballasts can retain charge for several seconds after power is removed.
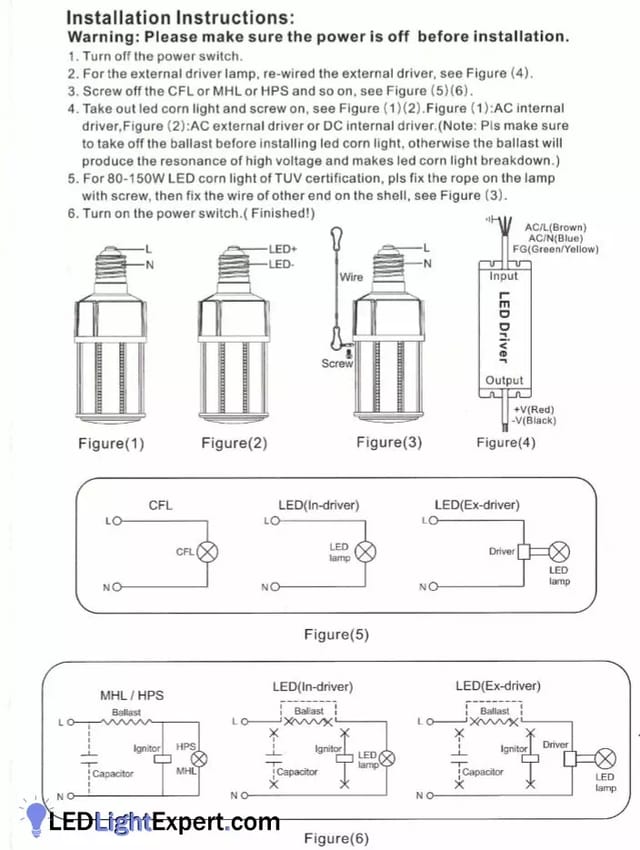
2. For an external driver lamp — our LED corn bulbs have the driver internally; external-driver lamps are retrofit kits or specialized fixtures where the driver mounts separately — re-wire the external driver per the kit instructions. See Figure (4) in the diagram below.
3. Remove the old bulb (CFL, metal halide, or HPS) from the socket and unscrew or unplug the ballast from the fixture. You may have to cut or disconnect some wires to do this — see Figure (5) and Figure (6). Identify the wires that connect to the power supply and the socket. You may have to use a wire stripper or a multimeter to do this. The power supply wires are usually black (hot) and white (neutral), while the socket wires are usually red (tip/positive) and blue or black (shell/neutral).
4. Take out the LED corn light and screw it in — see Figure (1) and Figure (2). Figure (1) shows an AC internal LED driver (the standard corn bulb configuration); Figure (2) shows an AC external driver or DC internal driver (retrofit kit or specialty). Note: Please make sure to take off the ballast before installing the LED corn light — otherwise the ballast will produce resonance and high-voltage transients that will cause the LED corn light to break down and fail.
5. Safety cable for larger corn bulbs — for large LED corn lights with an included safety cable (usually 80 watts and up, depending on model), fix the cable loop to the lamp body with the provided screw, then fix the other end to the fixture housing shell. See Figure (3). This is an important step for shock or impact resistance in high-bay and pole-mount applications.
6. Turn on the power switch and test. Restore power at the breaker, verify the bulb lights cleanly with no flicker, and enjoy. If the bulb does not light, the most common faults are: (a) ballast not fully bypassed, (b) line/neutral reversed at the socket, or (c) a loose connection at a wire nut or terminal screw.
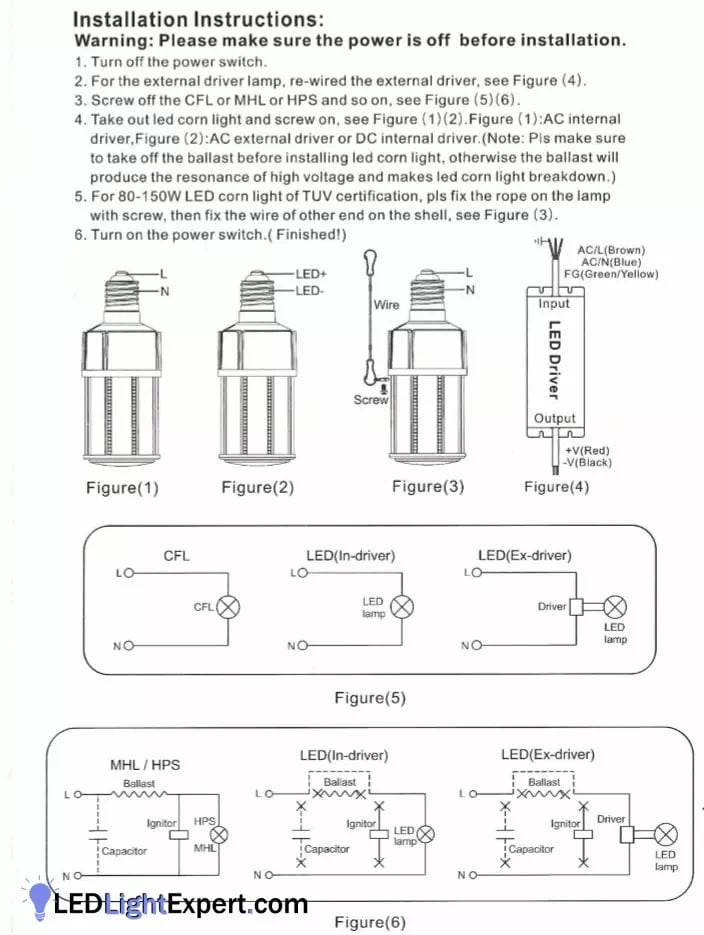
Diagram of ballast removal — figure-referenced corn bulb wiring for AC internal driver, AC external driver, DC internal driver, and safety cable configurations.
After the Bypass — Code, Warranty, and Commissioning Notes
A direct-wire ballast bypass is straightforward electrical work, but it crosses two compliance lines worth knowing. First, modifying a luminaire removes it from its original UL 1598 listing unless you use a UL-listed retrofit kit; many commercial specs require the retrofit kit for insurance and authority-having-jurisdiction (AHJ) sign-off. Second, NEC Article 410.130(G) covers luminaire disconnecting means and applies when you replace a ballast or rewire a fixture in a commercial setting. Check your local code amendments before you wire a pallet of fixtures at a job site.
For warranty, document the bypass: photograph the fixture label, note the date of retrofit, and keep the corn bulb order record. Most reputable LED corn bulb manufacturers (including our NextGen and Aries series) warrant the bulb against driver failure for 5 years, and warranty claims move faster when install photos and purchase records are on hand. Run a lux-meter spot check at the original foot-candle reference points after commissioning; a 250W metal halide that started near 21,000 lumens can be down to 10,000 or less after a decade of depreciation and dirt, so even a modest 60W corn bulb will outperform it at the task plane, and you will want that data to justify the next phase.
Frequently Asked Questions
More Details to Consider
Corn Light Wiring Instructions with Ballast bypass diagrams. Corn light wiring is a process of installing LED corn light bulbs in place of traditional CFL, metal halide, or high pressure sodium bulbs. LED corn light bulbs are more energy-efficient, durable, and bright than other types of bulbs. They have a cylindrical shape that resembles a corn cob, hence the name.
When installing a LED Corn Light bulbs, you may have to bypass the ballast to get it to work. This sounds daunting at first, but it is actually quite simple. You have to remember that you are not adding anything to the setup, just taking something out. We have a few tips and attached diagram with instructions.
Please remember to NEVER test a bulb with the ballast installed. Ballasts alter the voltage and will ruin the LED Driver. To install LED corn light bulbs, you may have to bypass the ballast, which is a device that regulates the current and voltage of the bulb. Bypassing the ballast means connecting the power supply directly to the bulb, without using the ballast.
This is because the ballast can interfere with the LED driver and cause damage or malfunction. See the full case study on this corn bulb installation or review the buyers guide before starting a retrofit. For incandescent, CFL, or other non-ballast fixtures, the installation is usually plug and play.
In these scenarios you are typically plug and play, no work required. These are your typical home, garage and business fixture where incandescent bulbs were originally. There is no excuse not to go LED Lighting with these fixtures. Use a few 12 watt or 20 watt lamps in a garage for brighter lighting.
A 40 watt or 60 watt work great in post lights or other fixtures where you are using high wattage incandescent. Metal Halide / High Pressure Sodium / CFL. light bulbs are typically powered by a magnetic or electronic ballast. For these you will need to remove the ballast and direct wire power to the light. The hardest part is typically identifying the wiring in the correct order.
Some ballasts may power multiple bulbs and you will have to join the wiring back together. Going with corn cob bulbs is ideal here for the energy savings. You can easily replace a 250 watt metal halide with a 60 watt or 80 watt corn bulb and save over 70% off your energy bill. A 120 watt or 150 watt lamp is an ideal replacement starting point for many 400 watt metal halide fixtures.
Jump up to 150 watt to 200 watt if you want a brighter 400 watt metal halide replacement. See our blog on lumens for replacing 400 watt metal halides with LED. Ballast Bypass for Corn Light Bulb Installation Instructions: To bypass the ballast and install LED corn light bulbs, you will need some basic tools and skills.
Turn off the power supply to the area where you want to install the light. You can do this by switching off the power switch or turning off the circuit breaker. (Turning off power at the circuit breaker is best practice). Warning: Please make sure the power is off before installation. For an external driver lamp, (Our LED corn bulb have the driver internally.
These are retrofit kits or others with the driver located separately. ) re-wire the external driver, see Figure (4). Remove the old bulb ( CFL or MHL or HPS and so on) from the socket and unscrew or unplug the ballast from the fixture. You may have to cut or disconnect some wires to do this, see Figure (5) (6). Identify the wires that connect to the power supply and the socket.
You may have to use a wire stripper or a multimeter to do this. The power supply wires are usually black (hot) and white (neutral), while the socket wires are usually red (positive) and blue (negative). Take out the led corn light and screw on, see Figure (1 )(2). Figure (1): AC Internal LED driver, Figure (2): AC external driver or DC internal driver. (Note: Please make sure to take off the ballast before installing led corn light, otherwise the ballast will produce the resonance of high voltage which makes led corn light breakdown and fail). For larger LED corn lights with an included safety cable, usually 80 watt and up depending on the model, fasten one end of the cable to the lamp with the supplied screw and secure the other end to the fixture housing as shown in Figure (3).
Turn on the power switch. (these are alternate models).
Frequently Asked Questions
- What does it mean to bypass a ballast for an LED corn bulb?
- A ballast bypass rewires the fixture so line voltage (120V, 208V, 240V, 277V, or 480V depending on panel) feeds the lamp socket directly, removing the magnetic or electronic ballast from the circuit. LED corn bulbs carry an internal driver that does the job the ballast used to do for HID or fluorescent lamps — leaving the old ballast in series will damage the LED driver.
- Can I leave the old ballast in the fixture and just swap in an LED corn bulb?
- No. Magnetic and electronic ballasts step voltage up, inject high-frequency ringing, or shape the current in ways the LED driver cannot tolerate. Running a standard LED corn bulb through an active ballast will typically fail the driver within minutes. The safe install is to remove the ballast and direct-wire line voltage to the socket.
- What wattage LED corn bulb replaces a 250W or 400W metal halide?
- A 60W or 80W LED corn bulb typically replaces a 250W metal halide at comparable lumens — a 70%+ energy reduction. For 400W metal halide, specify 120W to 150W for equivalent light, or 150W to 200W if you want a brighter result. Always compare delivered lumens and choose a corn bulb bin rated for your socket type (E26 medium or E39 mogul).
- What wire colors do I connect when I direct-wire a corn bulb?
- On line-voltage input, black is hot and white is neutral (120V U.S. systems). Socket wiring uses red for the tip (phase/positive) and blue, black, or white for the shell (neutral/negative); always verify with a meter before energizing, because older fixtures may use non-standard colors. Torque terminal screws per NEC 110.14(D) using the manufacturer's listed values (typically 10–14 in-lb for #14–12 AWG lugs).
- What safety steps are required before starting a ballast bypass?
- Lock out and tag out the circuit at the breaker — switching the wall switch alone is not sufficient. Verify dead with a non-contact voltage tester at the socket leads. Wear safety glasses and insulated gloves. Follow NEC Article 410 for luminaire wiring and local amendments. For commercial retrofits, confirm the fixture remains UL 1598 listed after modification or use a listed retrofit kit.
- Is the ballast bypass reversible?
- Technically yes, but it is rarely worth the effort. The ballast is typically cut out of the circuit with its high-voltage output leads capped off and labeled or removed entirely. Keep the original ballast if you need to restore the fixture for a future metal halide lamp, otherwise most commercial installers discard it and document the change on the fixture label.

Ready to upgrade? Tell us the space and we will size it with you.
Our lighting specialists can help compare options, confirm light levels, and quote the right products for your project.
Call 800-674-9420 or email [email protected]
Monday-Friday, 8am-5pm PST

About the Author
Dara Greaney is founder and CEO of LED Light Expert with deep expertise in commercial LED lighting, retrofits, and photometric planning.
Editing by David Peguero
Tagged Products


1 Comments
The Go-To Crew Electric
Installing LED corn lights by bypassing the ballast ensures optimal performance and longevity. It’s essential to follow the wiring diagrams carefully to avoid damaging the bulbs. LED corn lights offer superior energy efficiency and brightness, making them a smart choice for upgrading lighting systems. Great tips and diagrams provided!
Sales
Thanks for reaching out. Please feel free to reach out to us directly at 800-674-9420 or [email protected] for pricing/quotes or product info at any time


