How to Adjust the Slip Fit Mount on LED Parking Lot Lights
Quick Answer: A slip fit mount has a 2 3/8" (60.3 mm) opening that slides over a cylindrical tenon on the pole. Loosen the angle-adjustment bolt (typically M4, M6, M8 Allen or M14 hex), set your desired tilt, and retighten to manufacturer torque spec. The slip fit provides 360° horizontal rotation and nearly 180° vertical tilt — the widest adjustment range of any pole-top mount type.
Many area lights, such as LED parking lot lights or street lights, come with
slip fit mounts or slip fitter mounting, and there are lots of questions about how to install, adjust, and size them. In this article, we break it down and give answers based on field-verified installs across thousands of
LED parking lot lights and
street lights deployed under ANSI C136.31 vibration standards and IES RP-8 roadway lighting guidelines.
What Is a Slip Fit Mount?
A slip fit mount features a circular opening with a diameter of 2 3/8 inches (60.3 mm). It is engineered to slide onto a cylindrical structure known as a tenon and is then fastened using side bolts — typically 4 hex set screws for standard parking lot fixtures, up to 8 for heavier stadium fixtures. This mount type is frequently used for area or parking lot lighting because of its unmatched adjustability.
A slip fit mount is also known as a slip fitter, slipfitter adapter, or slipfitter bracket — all four terms describe the same pole-top hardware. The 2 3/8" standard traces back to mid-20th-century utility-pole fittings and is now codified across virtually every North American outdoor lighting manufacturer.
Why Slip Fit Mounts?
A slip fit mount allows you to adjust the angle and direction of the light fixture to suit your lighting needs. Slip fit mounts have the big advantage of 360 degree rotation horizontally and almost 180 degrees of vertical adjustment. This is the most of any mount and a big reason for the popularity across sports courts, parking lots, and general area lighting installations where photometric aim is critical.
What Is a Tenon in Lighting?
In lighting, a tenon is a cylindrical or rectangular post or extension at the top or side of a pole that allows for the attachment of fixtures, such as lights. The tenon works in conjunction with mounting accessories like a slip fit mount or slipfitter. The slip fit mount slides over the tenon and is then secured in place, typically with bolts or screws, ensuring a sturdy connection between the light fixture and the pole. This system allows for easy installation and adjustment of fixtures, and it's commonly used in outdoor lighting setups such as parking lots, stadiums, and municipal street lighting.
Key takeaway: Note in this picture the size is 2.44 inches instead of 2.38 (2 3/8 inch), which leaves clearance so the mount can slide over the tenon. Usually the mount is a touch bigger than 2.38 and the tenon a hair smaller — typically 2.365" to 2.375" on the pole side. This slip-fit tolerance is what allows the mount to slide on without galling and rotate freely until you tighten the set screws.
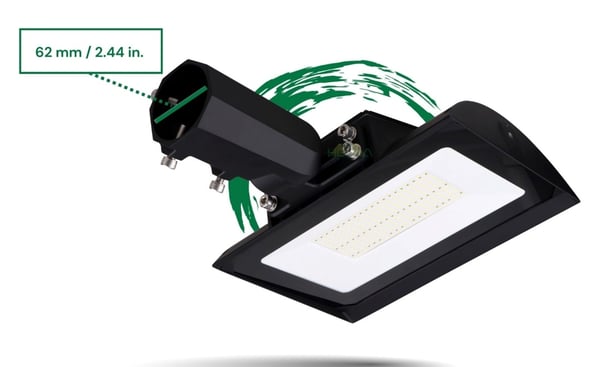
The mount opening measures 2.44 inches — slightly larger than the 2 3/8" (2.375") standard tenon to allow a smooth slip-fit.
What Size Light Pole or Tenon Does the Slip Fit Go On?
Keep in mind that the light poles that go in the ground are different from the light poles that these slide over. Standard in-ground lighting poles are 3 inch round to 5 inch square, or something in that range. You will then need a tenon adapter or a light bullhorn to attach the slip fit mount to the pole. Both adapter types bolt to the pole top with a 2-bolt or 4-bolt pattern and raise a 2 3/8" tenon stub for the fixture.
Standard lighting poles for the lights themselves are 2 3/8 inch. (We don't know why either, it's just the industry standard.) All of our slip fit mounts will slide over a pole up to this size. If using a non-standard pole, we do not recommend going much below 2 inches, as it may affect the stability and alignment of the light, and can fail ANSI C136.31 vibration testing in roadside applications.
Pole and Tenon Sizing Reference
| Component |
Standard Size |
Notes |
| Slip Fit Mount Opening |
~2.44" (62 mm) |
Slightly oversized for tenon clearance |
| Standard Tenon |
2 3/8" (60.3 mm) |
Industry standard — do not go below 2" |
| In-Ground Poles (Round) |
3"–4" diameter |
Requires tenon adapter or bullhorn to attach slip fit |
| In-Ground Poles (Square) |
4"–5" square |
Requires tenon adapter or bullhorn |
| Mounting Bolts |
2–8 hex set screws |
Must be fully tightened — fixtures can exceed 20 lbs |
| Angle Adjustment Bolt |
M4, M6, M8 Allen or M14 hex |
Loosen to adjust tilt, retighten to spec |
LED Parking Lot Mounts Explained — Slip Fit vs Arm Mount vs Yoke
This video walks through the three main pole mount types for LED parking lot lights — slip fit, arm mount, and yoke — showing how each attaches and when to use it.
Slip Fit Mount vs Arm Mount Comparison
The two most common pole mount types for parking lot and area lights are the slip fit and the arm mount. Each has trade-offs depending on the fixture weight, wind load, and adjustability needed for the site.
| Factor |
Slip Fit Mount |
Arm Mount |
| Horizontal Rotation |
360° |
Fixed (determined by arm position) |
| Vertical Tilt |
~180° |
Fixed or limited (~30°) |
| Post-Install Adjustment |
Easy — loosen bolt, rotate, retighten |
Difficult — may require arm repositioning |
| Wind Resistance / EPA |
Good (compact profile) |
Better (rigid connection, offset from pole) |
| Best Application |
Sports courts, adjustable area lighting |
Fixed parking lots, streets, commercial areas |
| Multiple Fixtures Per Pole |
Requires bullhorn with multiple tenons |
Multiple arms easily attached |
How Does the Slip Fit Bolt Down to the Tenon?
Safety Warning: Some of these lights are over 20 lbs. A 20 lbs light falling to the ground could injure or kill someone. Take the time to do it right and secure your light. Always tighten all mounting bolts to manufacturer torque spec (typically 15–25 ft-lbs for M8) and verify the fixture is secure before leaving the work area. Follow OSHA 1926.501 fall-protection requirements for any work above 6 feet.
The slip fit mount will have 2-8 bolts, usually hex nuts, that you will need to tighten down. We cannot stress how important it is to secure the lights properly.
Here is a picture of a
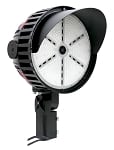
stadium light with a slip fit and wires coming out. The wiring exits through the tenon from inside the pole, keeping all weather-exposed connections inside the IP-rated fixture housing.
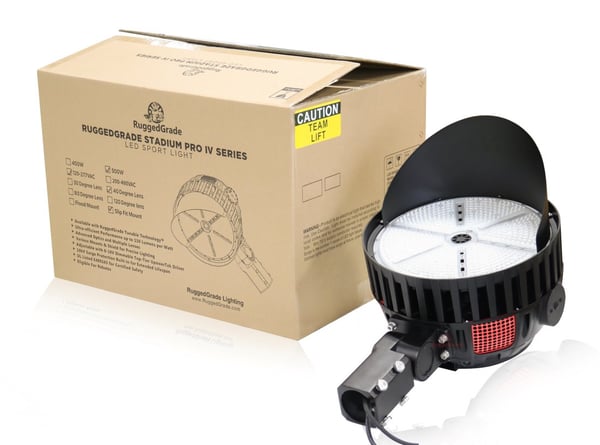
A stadium light with a slip fit — wiring exits through the tenon from inside the pole, keeping connections inside the IP65+ housing.
What Angle Should I Choose?
The beauty of a slip fit mount is that you can set the angle how you need it. The first rule is typically to angle the light towards the middle of where you need it. This is ideal for
sports court lighting or general area lighting. Often in
LED parking lot lighting, they are angled at 90 degrees from the pole to keep the even down lighting and avoid glare into neighboring properties per IES TM-15 BUG (Backlight-Uplight-Glare) ratings.
Pro Tip: For sports courts where the poles are at the edge, angle the fixture slightly past center to avoid hot spots directly under the pole. A
free photometric study can tell you the exact tilt angle needed for your pole height, fixture spacing, and target footcandle level per IES RP-8 roadway or IES RP-6 sports lighting guidelines.
How Do I Adjust the Head to Get the Angle I Want?
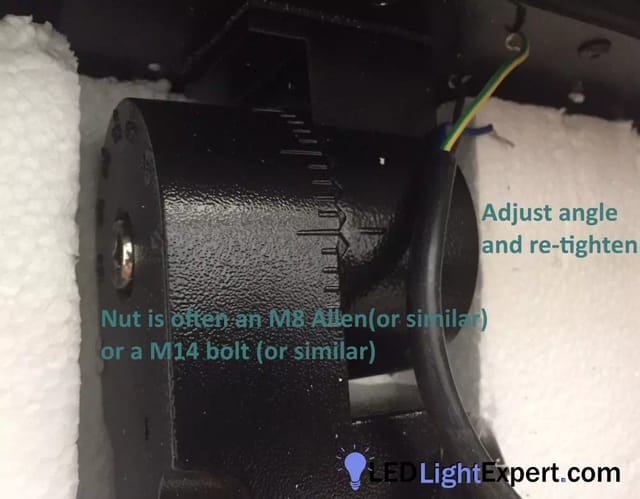
The light head has a bolt holding the slip fit mount in place. It is probably a metric Allen wrench, typically a size M4, M6 or M8, or a full bolt about an M14 size or so. Loosen that bolt to get the angle you need, adjust the angle and then tighten it again. Make sure the bolt is firmly secured and the light head is stable before leaving the work area — a loose head can walk out of aim under wind vibration over time.
Checklist: Installing a Slip Fit Mounted Light
-
1.
Verify tenon size. Confirm the tenon is 2 3/8" diameter (standard). If using a non-standard pole, ensure you have the correct adapter rated for your fixture EPA and wind zone.
-
2.
Route wiring through the tenon. Feed power wires up through the pole and out the tenon before mounting the fixture. Leave at least 12" of service loop inside the pole.
-
3.
Slide the mount over the tenon. The slip fit opening should slide smoothly. If it does not, check for burrs, paint buildup, or corrosion on the tenon and clean with a wire brush.
-
4.
Set the horizontal direction. Rotate the fixture 360° to point toward your target area before tightening the set screws.
-
5.
Set the vertical tilt angle. Loosen the angle-adjustment bolt, tilt to the desired angle per the photometric plan, and retighten to spec.
-
6.
Tighten all mounting bolts. Secure every bolt on the slip fit — typically 2–8 hex bolts. Use a torque wrench set to the manufacturer spec (commonly 15–25 ft-lbs for M8).
-
7.
Connect wiring and test. Make electrical connections per the fixture wiring diagram, verify polarity, then power on and verify the light pattern matches the photometric plan.
Sources & References
- LED Light Expert — Pole Mount Lighting Guide. Covers mount types, pole specifications, and hardware selection.
- LED Light Expert — LED Parking Lot Lights with Slip Fit Mount. Product category with spec sheets and mounting details.
- LED Light Expert — Street Light Mount Types and Wiring. Detailed guide to mount types including slip fit, arm, and yoke options.
- ANSI C136.31 — Roadway and Area Lighting Equipment: Luminaire Vibration standard for pole-mounted luminaires.
- IES RP-8 — Recommended Practice for Design and Maintenance of Roadway and Parking Facility Lighting.
Frequently Asked Questions
Common questions about slip fit mounts, answered by our lighting team.
What is a slip fit mount on a parking lot light?
A slip fit mount has a 2 3/8" circular opening that slides over a tenon on a light pole, secured with side bolts. It provides 360° horizontal rotation and nearly 180° vertical tilt — the most adjustment range of any mount type. Also known as a slip fitter, slipfitter adapter, or slipfitter bracket.
What size tenon do I need for a slip fit mount?
The industry standard is 2 3/8" (60.3 mm) diameter. The mount opening is slightly larger (~2.44") for clearance. Do not use a tenon under 2" in diameter — it will not be stable and may fail ANSI C136.31 vibration requirements.
How do I adjust the angle on a slip fit mounted light?
Loosen the angle-adjustment bolt (typically M4–M8 Allen or M14 hex), tilt the head to your desired angle, and retighten firmly to manufacturer torque spec. Make sure the head is stable and does not move when you release it.
What is the difference between a slip fit mount and an arm mount?
A slip fit slides directly onto a tenon with full 360°/180° adjustment. An arm mount extends the fixture away from the pole on a rigid arm with a fixed angle. Slip fits are more adjustable; arm mounts provide more consistent positioning and better support for heavy fixtures under wind load.
Can I use a slip fit mount on any light pole?
Slip fit mounts need a 2 3/8" round tenon. Standard in-ground poles are 3"–5", so you will need a tenon adapter or bullhorn bracket to create the 2 3/8" tenon at the top. Ensure the adapter is rated for your fixture weight (EPA) and local wind conditions per ASCE 7 wind zone maps.
How many bolts secure a slip fit mount to the tenon?
Most slip fit mounts use 2 to 8 set-screw hex bolts — 4 is standard for parking lot lights and 6–8 for heavier stadium and sports fixtures. All bolts must be tightened to manufacturer torque spec. Some LED fixtures weigh over 20 lbs, and a falling light can cause serious injury, so proper bolt torque is a safety-critical step.
Frequently Asked Questions
- What is a slip fit mount on a parking lot light?
- A slip fit mount (also called a slip fitter, slipfitter adapter, or slipfitter bracket) features a circular opening with a 2 3/8-inch diameter that slides over a cylindrical tenon on a light pole. It is secured with side bolts and allows 360-degree horizontal rotation and nearly 180 degrees of vertical tilt adjustment — the widest range of any pole mount type.
- What size tenon do I need for a slip fit mount?
- The industry-standard tenon size is 2 3/8 inches (60.3 mm) in diameter. The mount opening is typically slightly larger — around 2.44 inches — to allow the mount to slide on smoothly. Do not go below 2 inches in diameter, as it may compromise stability, alignment, and wind-load resistance per ANSI C136.31 pole vibration standards.
- How do I adjust the angle on a slip fit mounted light?
- Loosen the bolt holding the light head to the slip fit bracket — typically a metric Allen wrench (M4, M6, or M8) or a full hex bolt around M14. Adjust the head to the desired angle, then retighten firmly to manufacturer torque spec (typically 15–25 ft-lbs for M8). Ensure the light head is stable before leaving the work area.
- What is the difference between a slip fit mount and an arm mount?
- A slip fit mount slides directly over a tenon and offers 360° rotation and nearly 180° tilt in a compact package. An arm mount extends the fixture away from the pole on a rigid horizontal arm, providing a fixed angle but more consistent positioning under high wind load. Slip fits are more adjustable; arm mounts are more stable for heavy fixtures (>35 lbs) or high-EPA applications.
- Can I use a slip fit mount on any light pole?
- Slip fit mounts require a 2 3/8-inch round tenon. Standard in-ground light poles are 3-inch round to 5-inch square, so you will need a tenon adapter or bullhorn bracket to attach the tenon to the pole top. Make sure the adapter is rated for the Effective Projected Area (EPA) of your fixture and the wind load at your installation height per ASCE 7 wind zone requirements.
- How many bolts secure a slip fit mount to the tenon?
- Most slip fit mounts use 2 to 8 set-screw hex bolts — usually 4 is standard for parking lot lights and 6 to 8 for heavier stadium and sports fixtures. All bolts must be tightened to manufacturer torque spec. Some LED fixtures weigh over 20 lbs, and a falling light can cause serious injury, so proper bolt torque is a safety-critical step.
Ready to upgrade? Tell us the space and we will size it with you.
Our lighting specialists can help compare options, confirm light levels, and quote the right products for your project.
Call 800-674-9420 or email [email protected]
Monday-Friday, 8am-5pm PST
Dara Greaney is founder and CEO of LED Light Expert with deep expertise in commercial LED lighting, retrofits, and photometric planning.
LinkedIn X (Twitter)
Editing by David Peguero